The nessus package at http://www.nessus.org/ is nmap on steroids. It can detect the systems on your network and the ports that are open on those systems. Not only that, it then probes those ports looking for known weaknesses and produces a nice set of HTML reports. These graphic reports are invaluable when determining what systems require security patches.
One should be a bit careful before blindly unleashing nessus on a network. While nessus is more than happy to probe all of the systems in your network, I've found that some of my systems do not handle the probing very well. My Linux and Windows systems all seem to survive. My LinkSys router also seemed to come through. However, my wife's IP phone and a old D-Link router needed to be reset after being probed by nessus. Also, my networked printer seems to survive the nessus probe, but puts out 10 or so pages of garbage each time its probed.
So, in general, I'd recommend that you carefully limit the systems which you probe on the network. Or, at a minimum, that you turn off your networked printers.
In order to bring up nessus using the Web User Interface, you will first need to click on the
Nessuslink which appears in theNetworkingtable of the WUI. Look at the row labeledScanas shown in the following:Before running a nessus scan on the network, you'll need to start the nessus daemon. The WUI provides two options for starting the daemon. If you select the , then the scans will include the information available at the time the Network Security Toolkit was built. If you press the , the latest set of scanning rules will be downloaded from the nessus web site prior to starting the nessus daemon (don't use this option if your Network Security Toolkit probe does not have access to the Internet).
Make a decision as to whether you want the Network Security Toolkit to download the latest nessus rules or not and then press one of the two buttons shown below:
Unfortunately, it takes a bit of time to start the nessus daemon. As a result, the Network Security Toolkit probe will inform you that it is still in the progress of bringing up the nessus daemon. You will need to be patient and periodically hit your web browser's refresh button, or click on the
herelink shown below until the Network Security Toolkit probe indicates that its ready to run a nessus scan:Eventually, you'll find that after pressing the refresh button enough times, the nessus daemon will eventually be found to be running. At this point, you'll be presented with a very simple interface to the nessus daemon. By default, it should already have the IP address of your system filled in. If you only wanted to scan your system, you could simply press the button at this point in time.
Instead of scanning just my laptop. In this example, I've decided to tell nessus to scan the systems ranging from 192.168.0.5 to 192.168.0.12. The following shows how I specified this range of IP addresses and the button that needs to be pressed to begin the scan.
After pressing the button, the Network Security Toolkit probe comes back indicating what system(s) are being scanned and that it will take a long time. Once again, I will need to be patient and wait for nessus to complete its work. While waiting, I can click on the
refreshlink to check on the progress.My last press of the refresh button tells me that nessus is still in the progress of running its scan. These scans are very thorough and can take a LONG time (think lunch). From the snippet shown below, I see that its running tests 107-110 on 192.168.0.12, tests 313-316 on 192.168.0.5, and tests 321-322 on system 192.168.0.11. I also see that there are 1727 tests total that will be run against all of the systems.
Finally, a press of the refresh button has yielded something other than a message telling me that the scan is still in progress. I finally have the results of my nessus scan available! With great excitement, I click on the
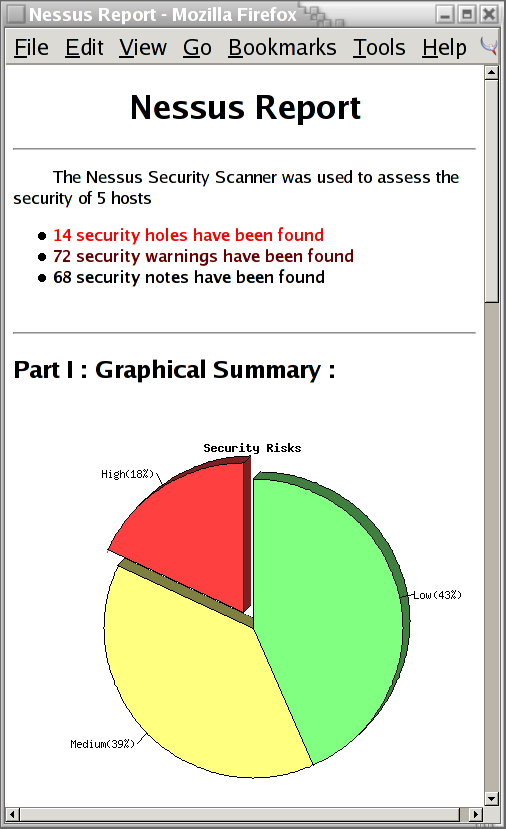
Toplink.The Nessus Report tells me that nessus found 14 security holes!
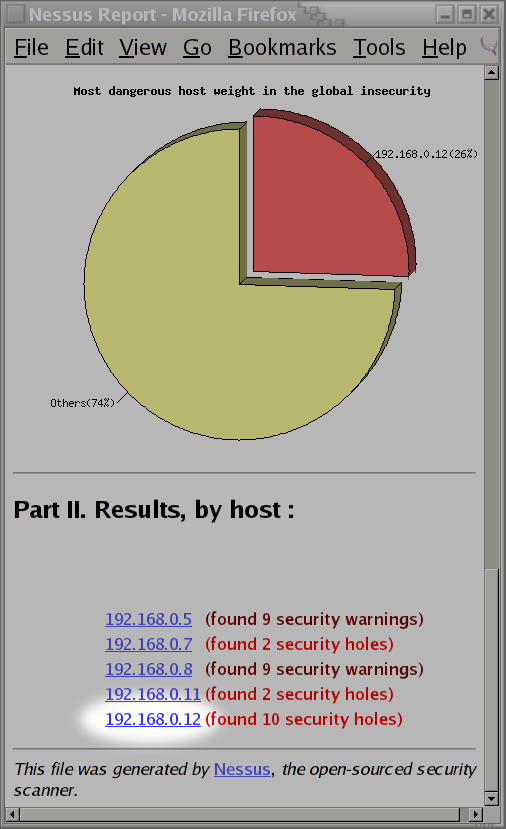
I wasn't too pleased to hear that nessus detected 14 security holes on my network. I scrolled to the bottom of the page to find that system
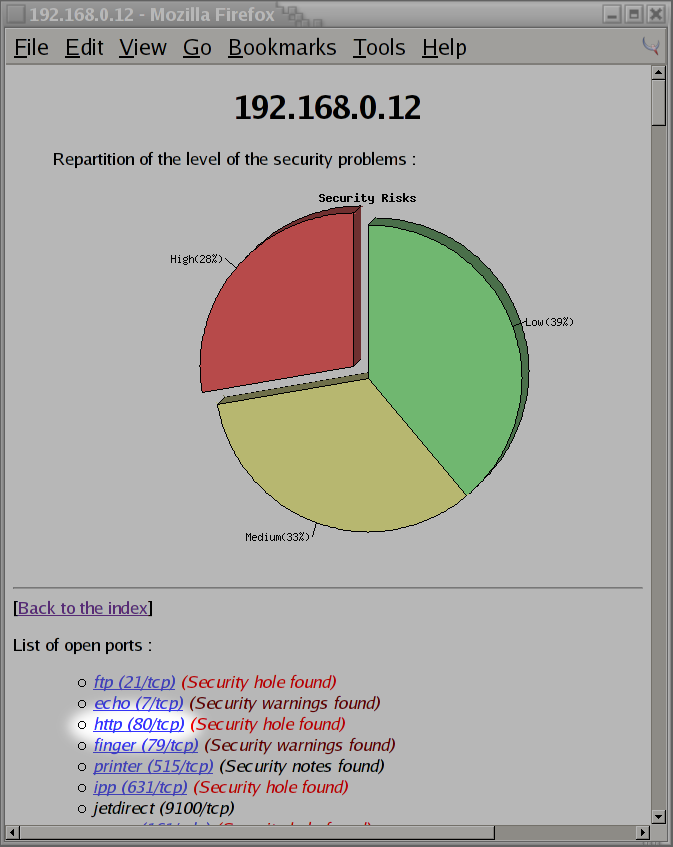
192.168.0.12had was responsible for 10 of the security holes. I then click on the link for system192.168.0.12to see what security issues were found:After clicking on the link provided by nessus, I immediately know why there were so many security holes found by nessus. System,
192.168.0.12is my Lexmark 412N laser printer. I forgot to turn it off prior to running the scan! If you'll remember back to the start of this section, I clearly stated that it was a bad idea to let nessus scan your networked printers. Sure enough, I forgot to turn mine off and wasted another 15 sheets of paper. After smacking myself on the forehead, I decided to see why nessus thought it found a security hole at port80.It appears that nessus was able to aquire the source code for some of the CGI scripts used by my Lexmark printer. Currently, I don't worry too much about the security of this network printer (I rely on a firewall and knowing the users which have access to it). However, if I were to be paranoid, I might consider searching for patches, or attaching the printer to a networked Linux box instead of putting it directly on the
LAN.


This concludes a sample session of using nessus from a running Network Security Toolkit probe. It should be enough to get you started at exploring the weaknesses in your local network. Hopefully, you will be wise and learn from my mistakes (avoid scanning your printers).